|
Using the VeriTime Kiosk
Set up a Computer to Act as a Kiosk
Using a kiosk gives your employees a central place to clock in/out. It also allows you to force the clocking in/out to happen at a location of your choice (if you also disallow permission to clock in/out through the employee portals).
It is recommended that you consult your IT department to set up a computer to act as a kiosk. They can save a shortcut on the desktop of the computer that automatically opens the proper kiosk. Often, the IT department will write a script to auto-launch the shortcut if the computer is restarted.
Note: Depending on your permissions setup you may not have access to all the functions you see here.
Create/Launch Kiosk from Aesop
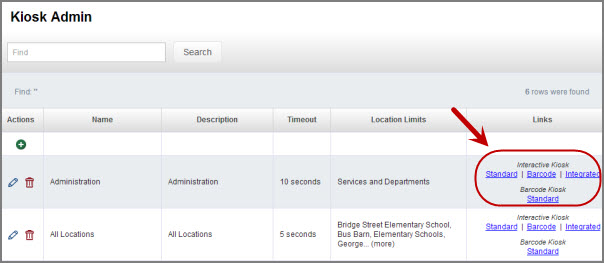
You can identify a specific kiosk so that all clock entries will note the exact location of the action in the Change Log, you can use the Kiosk Admin functionality. This feature also allows you to lock down a clock kiosk to a specific location, so that only locations defined for that kiosk are accepted.
Note: The IP address will already be noted in the Change Log, so this would be for situations where more detail is necessary.
On the computer you want to use as the kiosk, log into VeriTime. On the home page click the Kiosk Admin option under the Configure tab.
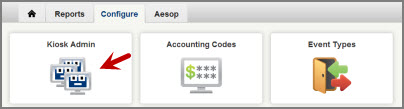
This will open the Kiosk Admin page.
Creating a New Kiosk
To add a new kiosk, click the + sign at the top of the left column. (To edit an existing one, click the pencil icon. Click the garbage can icon to delete one.)

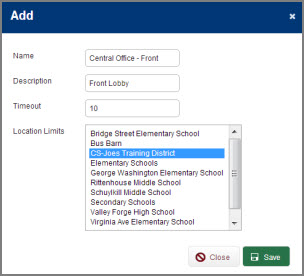
Give the new kiosk a name, description, and Timeout time.
For the Timeout time enter the number of seconds you want the Kiosk to wait until it "times out". A timeout means when a user who is clocking in is inactive for more than the number of seconds you specify, the kiosk will revert back to its original state. A setting of 5 to 10 seconds should suffice.
Then choose which location (or locations) can be selected from this kiosk when employees clock in/out. (To select multiple locations, hold down the Control key while you click other selections.)
Launch a Kiosk
To launch a specific kiosk, click the link for the type of kiosk you would like to launch.
Interactive Kiosk
Standard - Requires the User to enter their ID and PIN to clock in.
Barcode - Requires the User to scan in and select locations.
Integrated - Allows the User to scan in or use their ID and PIN.
Barcode Kiosk
Standard - Requires the User to scan in. They may scan multiple barcodes to select locations.