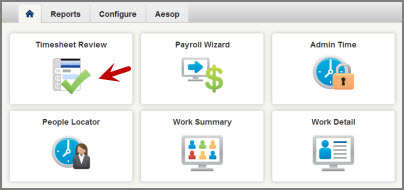
To access the Timesheet Review click that option on the VeriTime home page.
Note: Depending on your permissions setup you may not have access to all the functions you see here.
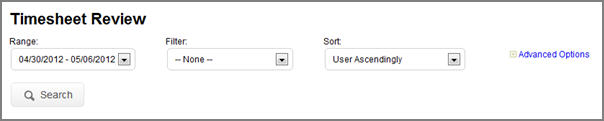
On the Timesheet Review page, pick the desired date range. The VeriTime Administrator will have set up the date ranges, but you can also select “Custom Range” at the top of the drop-down list. You can also use the Filter and Sort drop-down boxes to filter and sort the timesheet accordingly.
Filter Options
Outstanding Timesheets - Show only the timesheets that are not completely approved on all levels.
Rejected Timesheets - Show only the timesheets in rejected status.
Payroll Exceptions - Show only users who have payroll records that are marked as exceptional in the Wage Option Assignment page.
Net Difference - Show only users who's timesheets have a net difference.
Needs Approval - Show only users who's timesheets need approval.
For more advanced filtering, click the Advanced Options link. Here you can change the duration format from Time to Decimal. With the Time setting 7 hours and 15 minutes would show as "7:15". With the Decimal setting it would show as "7.25".
You can also filter by user name, location, Job Type, and Tags.
To apply the date range and filter options you have selected, click the Search button.

The timesheets will display for the date range selected. Each row gives the Total Scheduled, Total Paid, Total Time and Net Difference for the employees for that week. The Status of the timesheet is also shown.
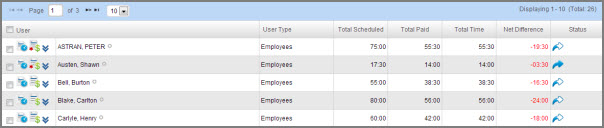
Total Scheduled - This is the number of hours based on the recurring schedule. For the date range you have chosen, this is what the person would have worked if all days were typical days (no absences or closed days).
Total Paid - This is the total time that the user will be paid for.
Total Time - This is the total time for the date range you have selected. Worked hours as well as paid absence durations count toward this time. Admin time is also calculated into this total.
Net Difference - The difference between scheduled and total paid time. If the total time is less than scheduled, it shows up as negative.
Status - The status of the timesheet will be shown by an icon. Below is the legend.
![]()
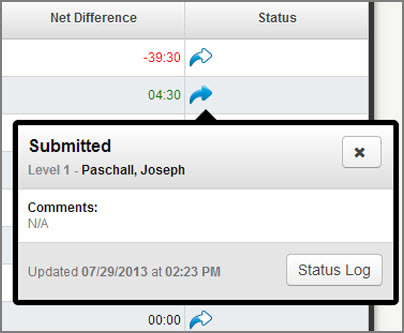
Clicking on the status icon brings up the status pop-up. The pop-up will show the last update made to that Timesheet Record whether it was submitted automatically by the system or if the User submitted it. It will also display comments if any have been entered, and list a time and date stamp for the last update. Also included in the pop-up is the Status Log button that will bring up the full status log for that timesheet record.
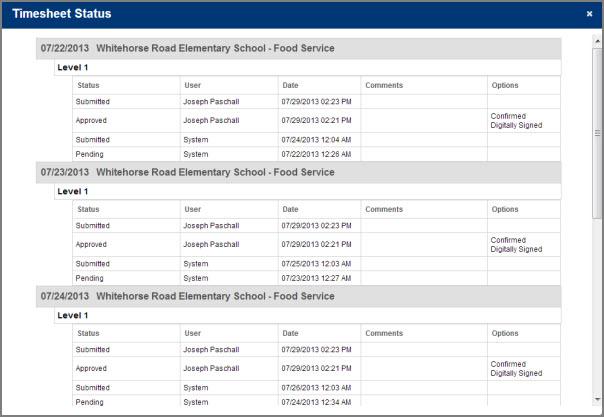
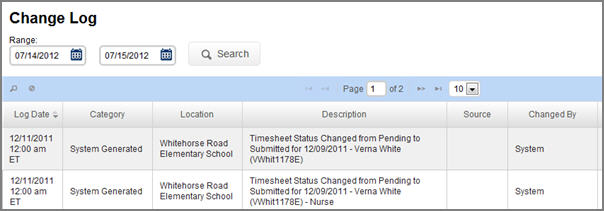
Here is what the Status Log looks like.
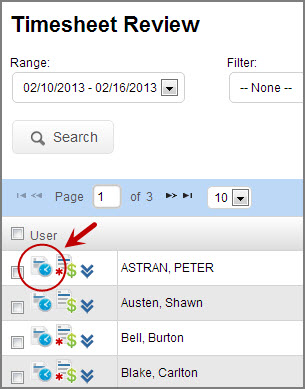
To expand a row on the timesheet, click the expand/collapse icon and VeriTime will give you each day’s timesheet summary data for that person.
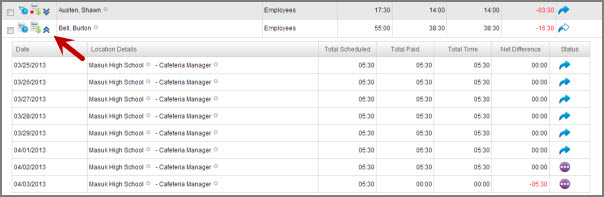
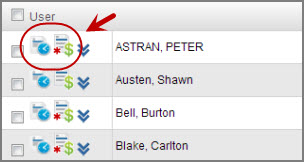
To see the actual Timesheet or the Payroll Review, click the corresponding icon next to the user's name. The Timesheet icon is the one with the clock. The Payroll Summary icon is the one with the dollar sign.
To take any action on timesheets use the Approve, Reject, or Reset Timesheets button at the top of the page. You will get a pop-up window where can choose from the following options.
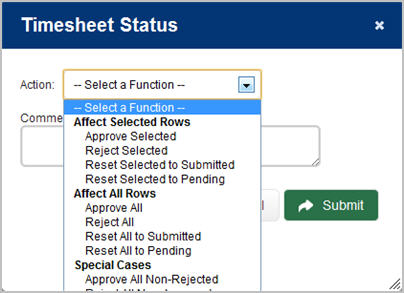
The available actions are:
• Affect Selected Rows – These actions require you to check the box for the timesheets on which you want to take the specified action. Only those timesheets that are checked on the visible grid will be affected.
• Affect All Rows – This will affect ALL timesheets regardless of the check box status, including rows on following pages.
• Special Cases
o Approve All Non-Rejected – This gives you a quick way to approve ALL timesheets on all pages that are not in Rejected status.
o Reject All Non-Approved – This gives you a quick way to reject ALL timesheets on all pages that are not in Approved status.
Click Approve, Reject or Reset as appropriate. Once a timesheet is approved, employees may no longer edit them. Resetting a timesheet will put it in Submitted status.
Note: If you reject a timesheet you may be required to select a Reject Reason and leave a comment.
To edit an employee’s timesheet, click on the timesheet icon on the Timesheet Review page.
When you launch the Timesheet, you will be looking at the date range previously selected. Each day for that range will have its own tab. You can click on the individual tabs to jump to that day or scroll down to each day.

At the top of the timesheet you will see the name of the user as well as the date range, total hours, and paid hours. You will also have some utility options.


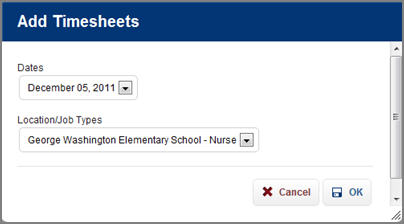
Add Timesheets
The first icon in the utility options represents Add Timesheets. Click it to bring up the pop-up window. This will allow you to enter time for a Location and Job Type that are not currently displayed. Choose a date you want to add a timesheet to and which Location/Job Type combination you would like to use. Click OK to save or Cancel to cancel.
Copy Timesheets
The second icon represents the Copy Timesheets option. If you are manually entering time, you can copy the times for a day by clicking the icon. A pop-up like the one below will come up.
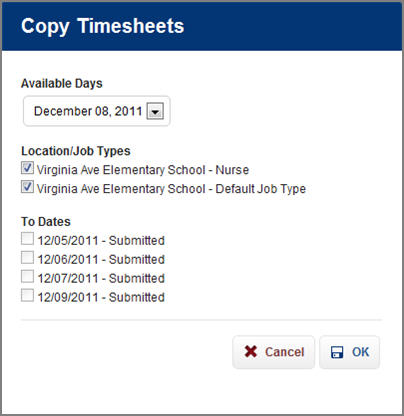
Select the date and Location/Job Type you want to copy, and select the day/days to which you want to copy those times. Then click the OK button. This will take the times from the currently selected date for that Location/Job Type, and copy them to all the days checked.
Note: If time already exists for that Location & Job Type on a day you are copying to, it will be overwritten. If time exists for a different Location & Job type on a day you are copying to, that time will still remain on that day and be unaffected by the copy process.
Payroll Summary
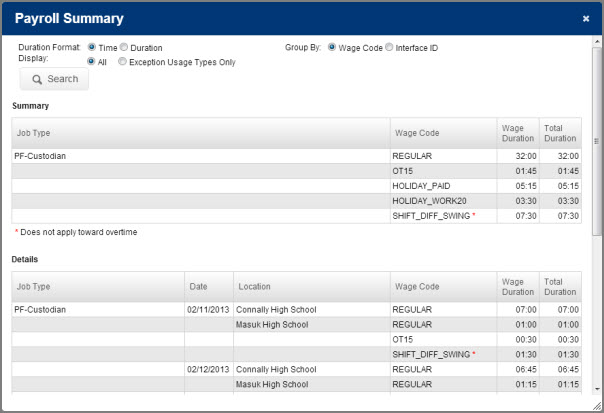
The third icon (the $ symbol) represents the Payroll Summary. To see a breakdown of the hours by pay type (Regular, Overtime, etc.), click this icon. This will open a pop-up window showing the payroll summary for this timesheet. Below is an example of a payroll summary.
The page is broken up into three
sections. The
top section provides different filtering and grouping options.
The Exception Usage Types Only
option will limit the Wage Codes to only exception Wage Codes assigned
in the Wage Code assignment screen.
The Group By option allows a user to view the payroll data by VeriTime’s Wage Codes or by a combination of Interface ID and Custom ID. The system will attempt to use the Custom ID provided in the Wage Option screen. If that does not exist, the system will use the Interface ID provided on the Wage Code Assignment screen. If that does not exist, the system will default to use VeriTime’s Wage Code.
The Summary section provides a summary of payroll information by Job Type and Wage Code.
The Details section provides a detailed list of payroll information by Job Type, date, location and Wage Code.
Change Log
Click the last icon (the one that looks like a sheet of paper) to see the Change Log for this timesheet. You can change the date range for the change log to see more information. For more information on Change Logs click here.
Note: As you make changes to any day on the timesheet, click the Save or Cancel buttons to save or cancel your changes for that day.
Click on a left tab to jump to the timesheet for that day.
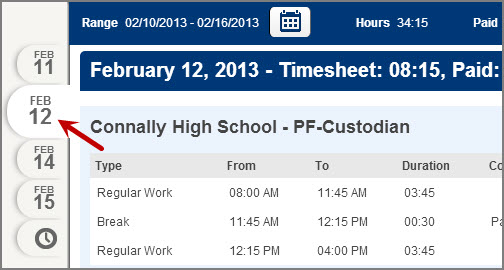
The section shown below is the main part of the timesheet.
Note that each combination of Location & Job Type will have its own entry here. (Use the Add Timesheets icon described above to create an entry if the Location/Job Type you need is not displayed. If you don’t need an entry that is displayed, you can delete it by clicking the delete button on the right.)
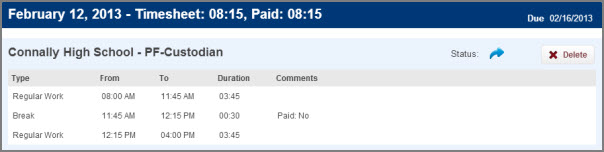
The second section (Events) is the one you will use the most, because this is where you will enter or modify times or durations. (If the web clock was used, those times will already be in this section.)
To add an event, choose an event type in the drop-down menu and type the times into the empty Clock In and Clock Out boxes. Then click the green confirm button. That event will be added to the timesheet. To edit an event, click the pencil icon. Use the garbage can icon to delete an event.
Remember, to save these changes you must click the Save button at the top of the timesheet.
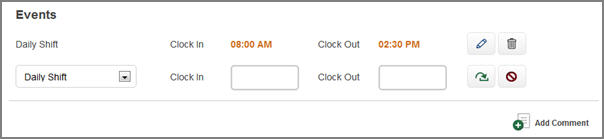
When time is manually entered or adjusted in VeriTime it will be displayed in orange.
You also have the ability to leave comments about this day in the timesheet. To leave a comment click the Add Comment button at the button of the section.
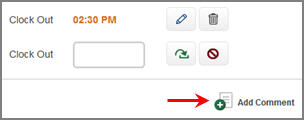
This will open a box where you can leave your comments. Click the green check mark button to save your comments. Click the red cancel button to cancel the comments.

Occasionally, you might see a box called Admin Times. This is where all Admin Time will be displayed. Admin Time might be time that you manually add or remove for an employee, auto-deducted breaks, or differences between scheduled times & durations (if using the auto-populate schedule feature).

The Admin time can be edited by clicking the pencil icon.

To save any changes you make to the Admin Time click the Save button at the top of the timesheet.
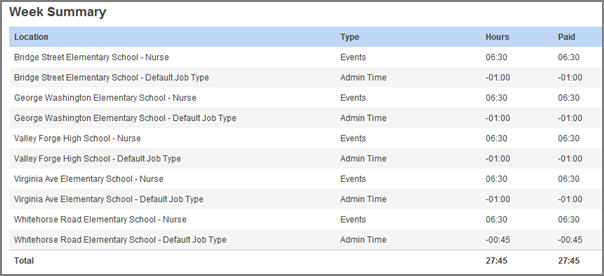
At the bottom of the timesheet, the hours for the time period will be summarized by Location/Job Type, Absences and Admin Time.