Summary
During the week of October 1, 2013, we will release several enhancements to VeriTime. Please read this document carefully, as there are some new features that you might find very useful. We continue to look for your feedback so that we can make VeriTime better with each release that we deliver.
Updates to Existing Features
User Settings: De-emphasize “Administers Others” – Wizard Step 1
In response to customer feedback, the VeriTime team has made adjustments to Step 1 of the User Settings Wizard to de-emphasize and clarify “Administers Others”.
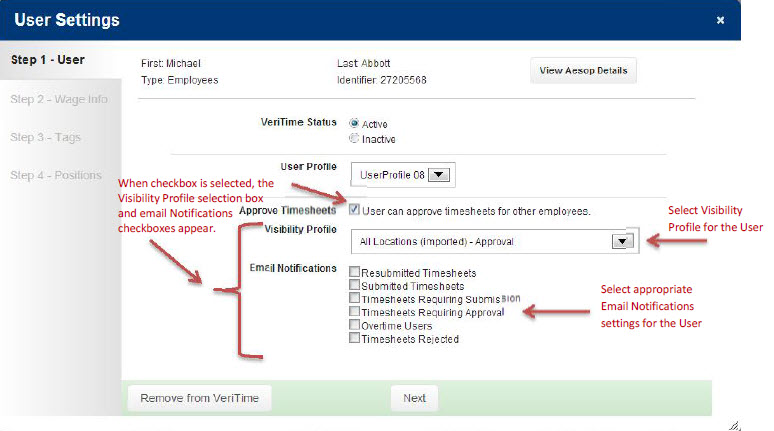
The ambiguous heading “Administers Others” has been replaced with a checkbox and a much more direct heading “User can approve timesheets for other employees.”
When checked, the Visibility Profile and Email Notifications appear on the screen. Otherwise, the bottom of the screen will be blank beneath the “Approve Timesheets” line.
Permission to Restrict/Allow Edit Positions on User Settings Wizard Step 4
In response to a customer request, the VeriTime team has added a permission to the “VeriTime” permissions settings in Aesop for Organization and Campus Users, to control whether the user is permitted to Edit a position on Step 4 of the User Settings Wizard.
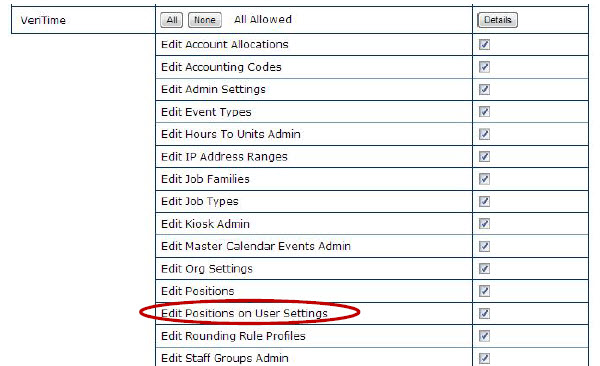
Editing a Position from this wizard may unintentionally create a new position. By deselecting the checkbox for “Edit Positions on User Settings”, VeriTime will not inadvertently create a new position.
Note: This permission setting affects only Step 4 of the User Settings wizard and does not affect the user’s ability to create new positions through Position Admin.
Additionally, this is an opt-in feature. All current customers and new customers will be set to allow editing of positions on the User Settings.
Update to Global Search
The VeriTime team has updated the Global Search capability to allow for more robust search functions. Global Search, is available in the header of every VeriTime page.

In addition to a User’s name, you may now search on any of the following parameters.
- Job Types
- Tags
- Visibility Profiles
- Job Families
- Work Schedules
- Positions
- Wage Options
- User Profiles
Master Calendar Events: More Granular
The Master Calendar Events function has been enhanced to allow for more flexible control over to which Employees or groups of Employees the calendar event will apply. The screen for the Master Calendar Events Wizard, Step 2 has been updated with a new look, and the additional functionality was added.
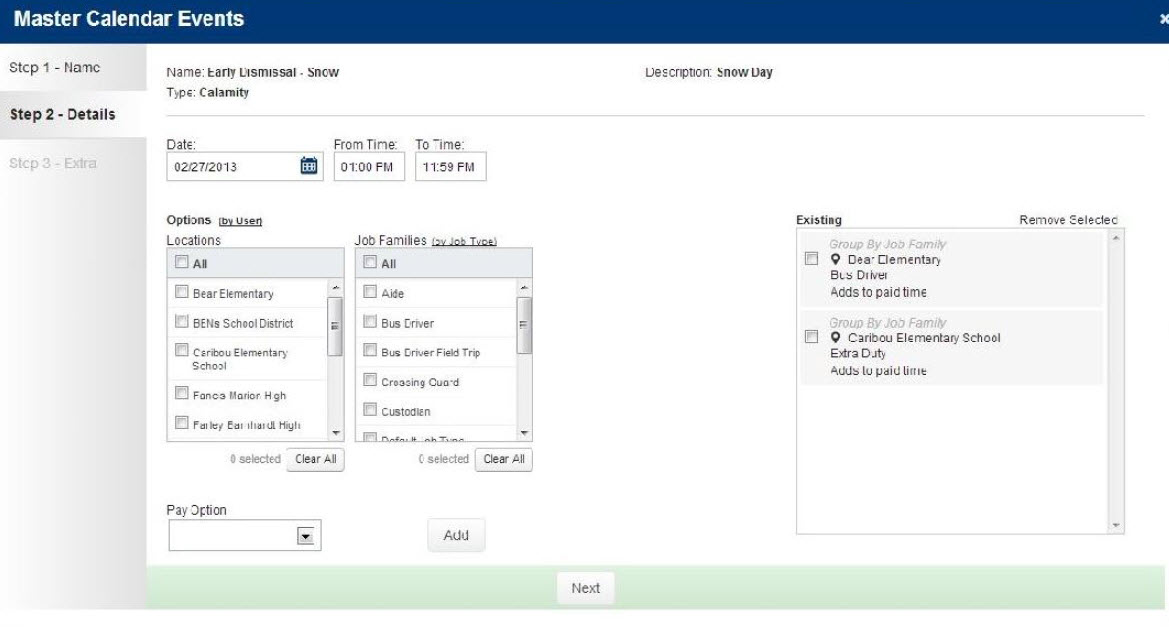
You can now create a Master Calendar Event and apply it to multiple Locations and Job Families in one transaction. Additionally, you can choose to apply an MCE to particular Job
Types and individuals.
Any combination of Location, Job Family, Job Type, and individual User can be selected. This will allow you to set a Master Calendar Event, for example, that applies:
- To all Locations, and Custodian Job Family as an Unpaid Holiday
- To the Lead Custodian Job Type as a Paid Holiday, and
- To John Smith who is a Lead Custodian but is an exception as an Unpaid Holiday
The net result being the exclusion of a single user from the Paid Holiday event that applies to the remainder of the employees in their Job Type of Lead Custodian, while also ensuring that the remaining employees with Job Types associated with the Job Family Custodian are not paid for the holiday – all in a single Master Calendar Event.

The VeriTime team has also included some very handy tools in the update of this wizard. At the top of the criteria selection boxes, there is a checkbox labeled “All” that will select all possible options to be added to the MCE.
Directly beneath the criteria selection boxes, there is a counter that will let you know how many options have been selected. That will come in handy when you have to scroll down the list to make individual selections. There is also a button labeled “Clear All” that will clear all the checkboxes rather than having to click on each checkbox individually.
To set up an MCE with the updated wizard, Step 1 has not changed, you will create a name and description, and select the MCE Type (Holiday, Days Off, Calamity, or Unscheduled Day), and click next.
Step 2 has changed:
- Select the date, from and to time
- Select the combination of locations, job families, job types, and users to whom the MCE should apply
- Select the pay option
- Click the “Add” button
- The selected options will be transferred into the selection window on the right hand side
- Once you have reviewed your selections and have made any necessary adjustments, click “Next”
Step 3 has not changed. If the MCE Type was “Unscheduled Day” then on step 3 of the wizard you will be prompted to enter the date that you want to pull forward for the unscheduled day. Otherwise, a message will appear indicating that the step is not required for the MCE Type selected. Click “Finish”.
Reporting Enhancements
ACA Report: Expanded to Report on All Users in an Organization
For this release, the VeriTime team has made two significant changes the ACA reporting function.
First, the ACA function has been expanded to accommodate running the report for all employees within an organization.
Second, the report for all employees, named the Health Care Qualifications Report, is now a full report.

A widget has been added to the Reports tab to access the full Health Care Qualifications report.
Note: The ability to run the report for a single user remains on the User Settings Admin page.
The Health Care Qualifications report includes the ability to select a date range for the report and the duration format (time or decimal). The data that is returned for each User is the same as it is today in the Individual User report.
The Summary Report view shown in the screenshot below returns – User Name, Job Type, number of Weeks worked within the look back period set in the range, average number of Hours per Week, and the number of Hours worked Over the 30 hour threshold set by government regulation.
The Detail Report view for a single User expands to list each Week included in the look back period set in the date range. The data returned in addition to the Summary view row is Week Ending Date, number of hours Scheduled to work, and the Total number of hours actually worked.
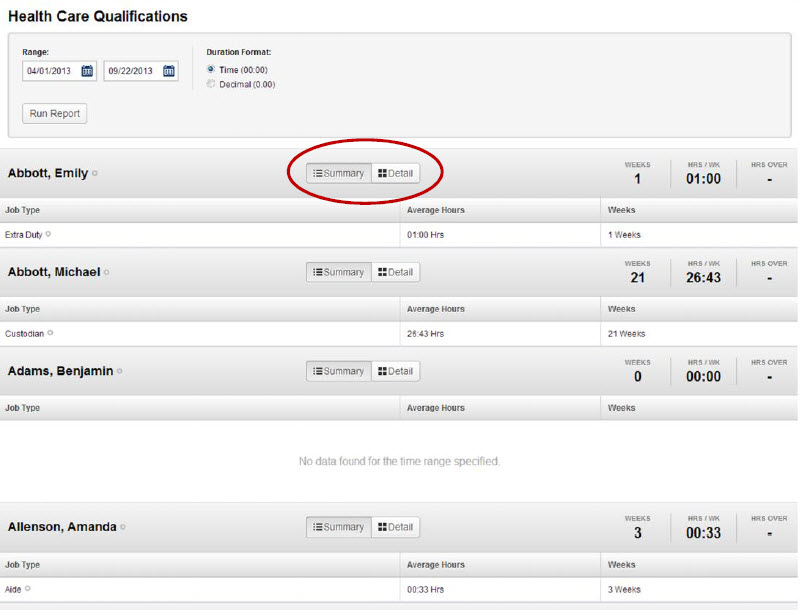
With this release, you will have the ability to run the report for every User associated with your Organization in VeriTime.
Note: the VeriTime team have plans to improve the Health Care Qualifications report in the short-term to add a few additional features. In the long-term, we are aware that still more features will be required before this report is optimal, however, the decision was made to hold some of those changes until the government regulations surrounding the ACA are solidified.
Changes to Work Schedule Association Report
The Work Schedule Association Report has been updated with a new look and functionality to make it easier to use.
Current Design
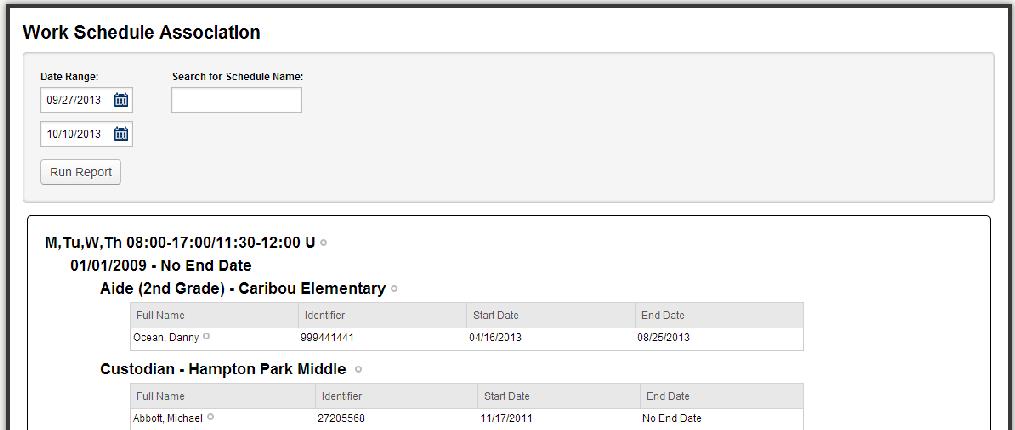
The new design features collapsible detail rows that allows for more schedules to be displayed on the screen at a time, therefore making the search for a particular schedule among many quicker.
New Design
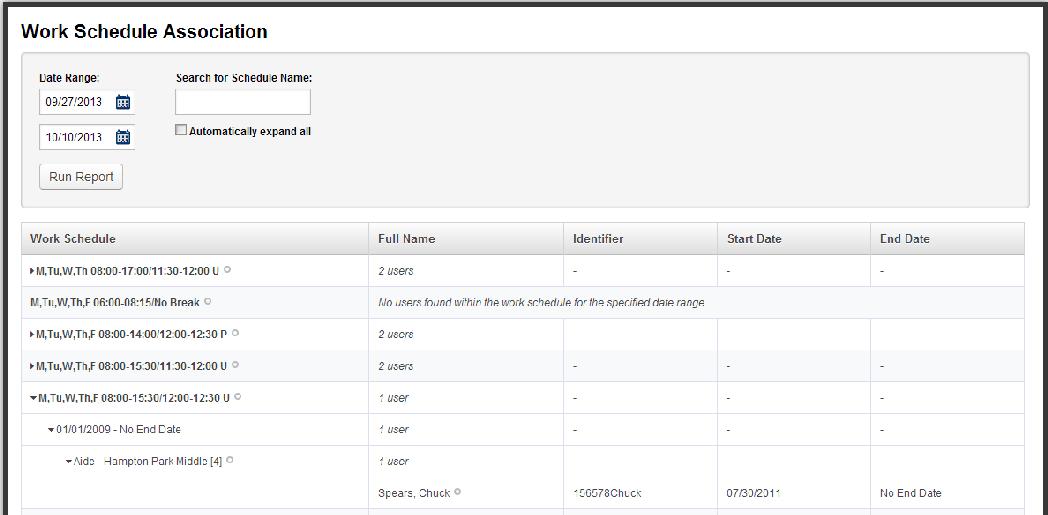
The updated design is more compact and presents the same data points as the previous version of the report, but in a more functional format.
Navigation arrows have been added to the report that allow the user to expand or collapse the detail for a given schedule.
- A right facing arrow indicates the item has collapsed rows beneath it.
- Clicking on the right facing arrow will expand the selection. The symbol will change to a downward facing arrow.
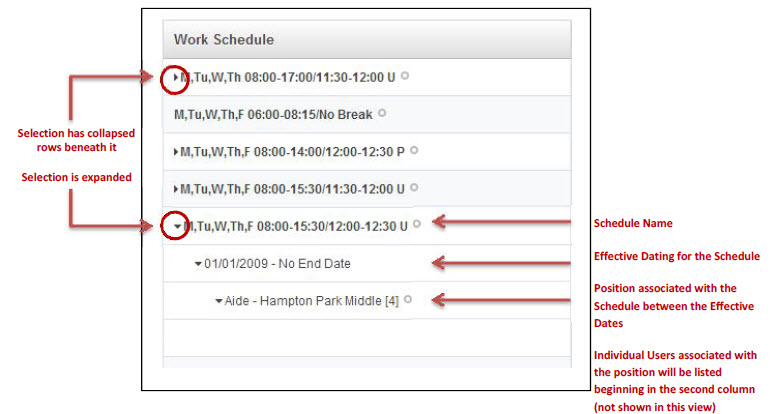
There are several levels of data available on this report:
- Schedule Name
- Effective dates for the schedule
- Position associated with the schedule between the effective date range
- Individual Users associated with the schedule between the effective date range and at the specified Position
New Features
Mobile Barcodes
With this release, VeriTime can now support using Mobile Barcodes on all of our Barcode kiosk options. This would allow a User to pull up their barcode on their smart phone to scan at the kiosk to clock in and
out of the system. You would no longer need to print and issue barcodes to each employee.
A permission has been added to Organization Settings – “Emps/Subs Can View Barcodes on Mobile Devices”. When checked, the User will be able to launch their Barcode from the Employee Portal once they log in to VeriTime on their smart phone.
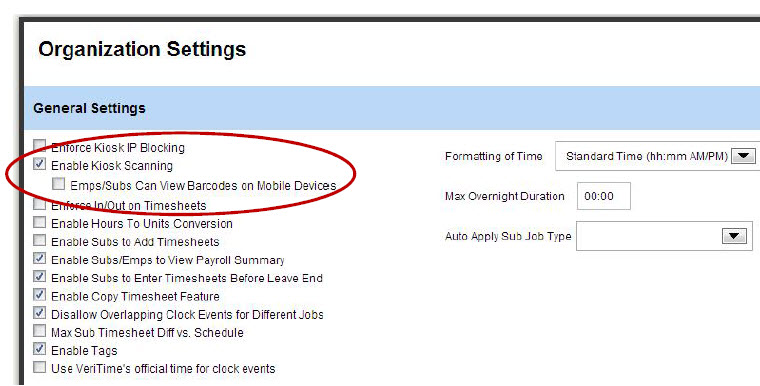
Note: This feature requires a higher-end USB barcode scanner that is designed to read digital barcodes. An ordinary barcode scanner will most likely have great difficulty reading the barcode from the reflective surface of the phone’s glass screen.
Reporting
Export to .csv file
The VeriTime team has added a feature to the report screens that will allow the user to export the data that appears on the screen in a comma separated value (.csv) file that can be opened in Excel.
There are a few specific restrictions that you should be aware of:
The Export to .csv file functionality does not work with the Internet Explorer web browser. Microsoft does not allow the screen capture functionality to operate in their browser. This is an insurmountable limitation. However, the Export to .csv file functioning has been tested and verified to work properly in all other popular web browser programs including Firefox and Google Chrome.
This functionality is only available on reports that return the data in a table format.
The following VeriTime reports offer this functionality.
- Work Summary
- Work Detail
- Clock Log
- Payroll Review
- People Locator
- Clock Exceptions
A button labeled “Export” has been added to all reports where this functionality is available.

The button will appear once the user makes their parameter selections and clicks on “Run Report.
Clicking on the “Export” button activates the Export to .csv file functionality. All of the data that has been returned as a result of the search will be captured in a .csv file and downloaded to your computer. A filename is automatically generated that begins with the report name, in this case Work Summary, and is followed by an ID number comprised of a date and time stamp.
Clicking on the .csv file will open it automatically into an Excel workbook. It is advised to immediately click ‘Save as’ in Excel, rename the file to something that you will remember, and save it to the file location in which you wish to store the file.
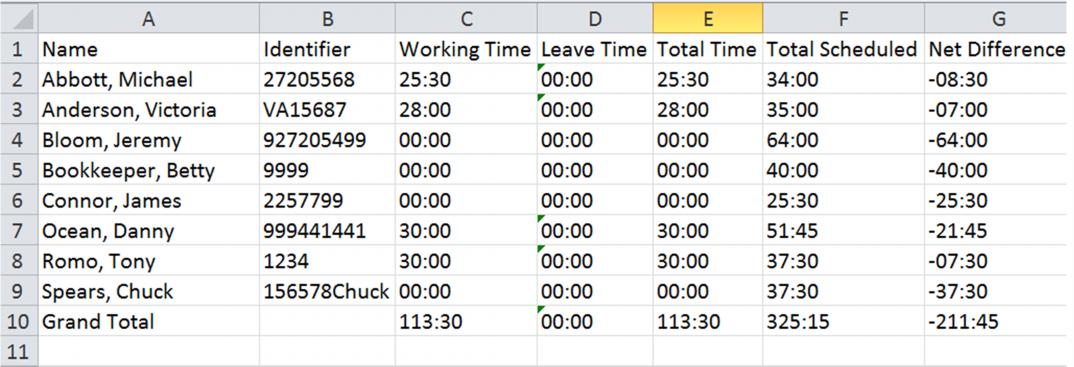
The resulting .csv file will contain exactly the same data that was displayed on the screen, under the same headers. From there, the Admin can sort, filter and manually manipulate the data.
