Summary
During the week of July 12, 2013, we will release several enhancements to VeriTime. Please read this document carefully, as there are some new features that you might find very useful. We continue to look for your feedback so that we can make VeriTime better with each release that we deliver.
New Features
New Interactive Kiosk Options
VeriTime will now offer two new Interactive Kiosk options in addition to the Standard (ID and PIN) Clock Kiosk and the Barcode Kiosk. From the Kiosk Admin page, you will have the ability to choose from three Interactive Kiosk types, Standard, Barcode, and Integrated.
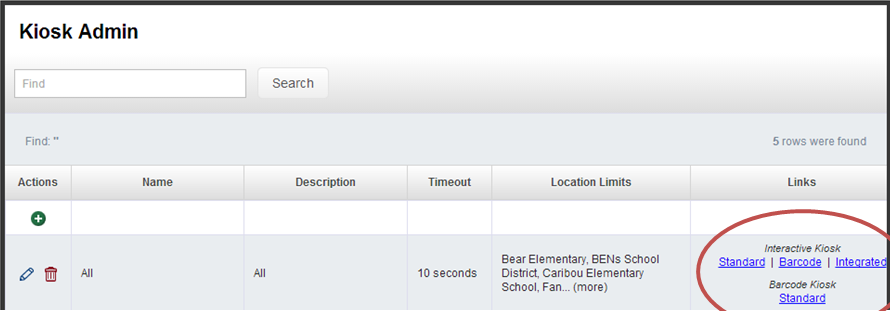
Standard – The Functionality of the Standard Interactive Kiosk has not changed. Selecting this option will launch the Clock Kiosk that prompts the employee to enter their ID and PIN. Once the employee enters an ID and PIN, the kiosk will display the Welcome Screen that prompts the employee to select the position and Clock-in.
Barcode – Will launch a Barcode Kiosk that indicates “Waiting for Scan”. This Interactive Kiosk allows the employee to swipe a barcode in lieu of entering an ID and PIN. Once the employee scans his or her barcode, the kiosk will display the Welcome Screen that prompts the employee to select the position and Clock-in.
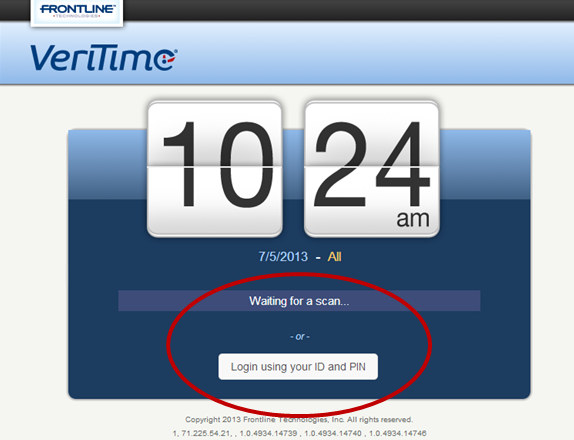
Integrated – Will launch a new Clock Kiosk that displays “Waiting for Scan” and will accept a User barcode. This kiosk also provides to the User the option to login using their ID and PIN instead of a User Barcode scan. Once the employee swipes their User Barcode, or enters an ID and PIN, the kiosk will display the Welcome Screen that prompts the employee to select the position and Clock-in.
Barcode Kiosk Standard – Functionality has not changed. This option will launch the Barcode Kiosk that indicates “Waiting for Scan”. Once an employee swipes a barcode, the system records the Clock-in or Clock-out time and the kiosk returns to the “Waiting for Scan” state for the next employee.
External Employee ID Access
For all Kiosk types, an employee can use their External Employee ID to Clock-in and Clock-out of VeriTime instead of their 10-digit phone number. An External Employee ID is a unique numeric identifier issued by the Organization. This ID must be stored in Aesop in the “External ID” field for the employee in order for this functionality to be available for use in VeriTime.
Timesheet Approvals: Separate permissions for the “Approve / Reject / Reset Selected” functionality
In response to Customer feedback, VeriTime has added Timesheet Approval Permissions that can be configured individually for a particular user. This enhancement will offer greater flexibility to the Organization in determining which Actions an individual Approver can take with regard to Employees’ timesheets.
For example: a District can choose to enforce a rule stating that the Employee must make all changes to his or her timesheet. With this new functionality, the Timesheet Approver Permissions can be configured so that “Approve Selected” and “Reject Selected” are the only Action options that are available to the approver.
When a new User is entered into VeriTime from here forward, these Permissions will default to All Active for Organization and Campus Users, therefore these users will be configured exactly the same way as they always have been.
If and when a District decides that they wish to make use of this enhanced configurability, the Timesheet Approval Permissions can be set in the Aesop User Permissions Profile Admin Screen. You will find an added set of Permissions, grouped together for ease of use, listed under the VeriTime settings. The new Permissions will appear as follows:
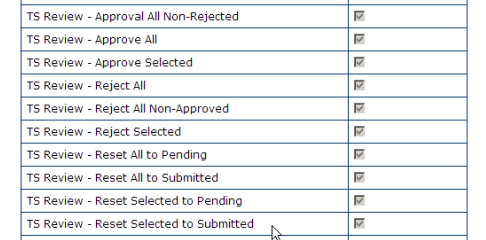
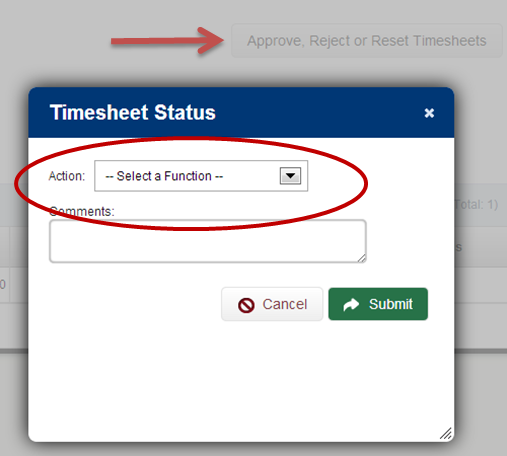
Once these Timesheet Review Permissions are set for the User, the Action options dropdown on the Timesheet Status popup wizard on the Timesheet Review Admin Screen will display only those options the Organization made available to the individual User.
Several new Timesheet Settings have been added to the Organization Settings Admin screen.
Timesheets Must Be Submitted Before Being Approved
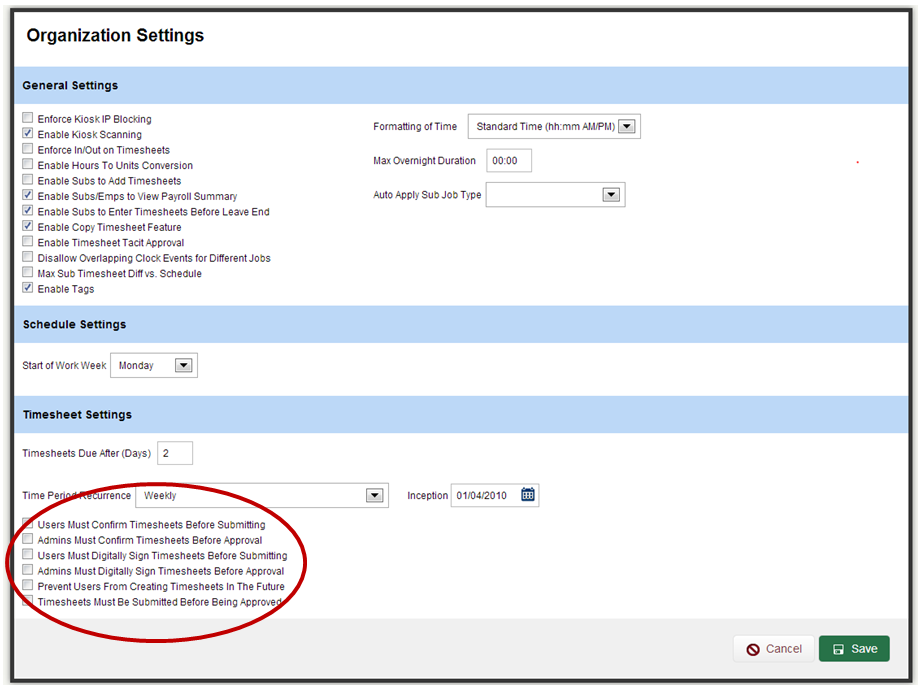
This setting prevents an Admin from Approving a timesheet that the Employee has not submitted. When this option is activated, an Admin will no longer be able to approve a timesheet that is in a partially submitted state.
Employee Timesheet Confirm: Users Must Confirm Timesheets Before Submitting
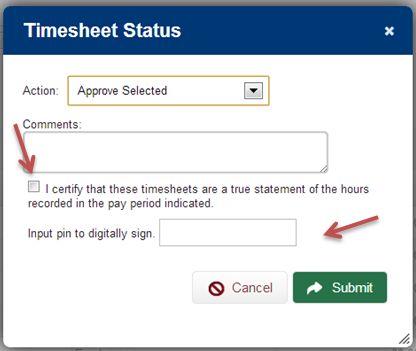
This setting requires the Employee to confirm the validity of their timesheet before submitting. When this option is activated, VeriTime will display a Timesheet Status popup window to the Employee upon clicking the Submit Button that requires the Employee to check a box next to a statement that reads “I certify that this timesheet is a true statemnet of the hours worked by this employee in the pay period indicated”.
Employee Digital Signature: User Must Digitally Sign Timesheets Before Submitting
This setting requires the Employee to enter their PIN to affix their Digital Signature to their timesheet before submitting. When this option is activated, VeriTime will display a Timesheet Status popup window to the Employee upon clicking the Submit Button that requires the Employee to enter their PIN a box that is labeled with the instructions “Input pin to digitally sign”.
Admin Timesheet Confirm: Admins Must Confirm Timesheets Before Approval
This setting requires the Admin to confirm the validity of the Employees’ timesheets before Approval.
Admin Digital Signature: Admins Must Digitally Sign Timesheets Before Approval
This setting requires the Admin to enter their PIN to Digitally Sign the Employees’ timesheets before Approval.
Timesheet Enhancement: Prevent Users from Creating Timesheets in the Future
When this setting is Activated for an Organization, the Employee is not permitted to create a timesheet for a future date. When the Employee clicks on the Icon to Add a Timesheet and enters a date beyond Today’s Date, the following notice appears.
Timesheet Permissions: Separate permissions to View and Edit timesheets
In response to Customer Feedback, the Timesheet Permissions that are set in Aesop for an Admin User have been updated to accommodate separate permissions for the ability to View and to Edit timesheets. This enhancement offers the ability to set up an Admin User who can View an Employee’s Timesheet but cannot Edit the clock entries. When permissions are configured in this manner, the Admin User would be required to reject the timesheet and send it back to the Employee with a comment requesting the Employee make the necessary changes and resubmit the timesheet.
This ensures that the Employee is made aware of any and all changes that have been made to his or her timesheet. When used in conjunction with requiring the Employee Confirm the validity of the timesheet before it is submitted and/or affix a Digital Signature, this creates a solidly verifiable transaction.
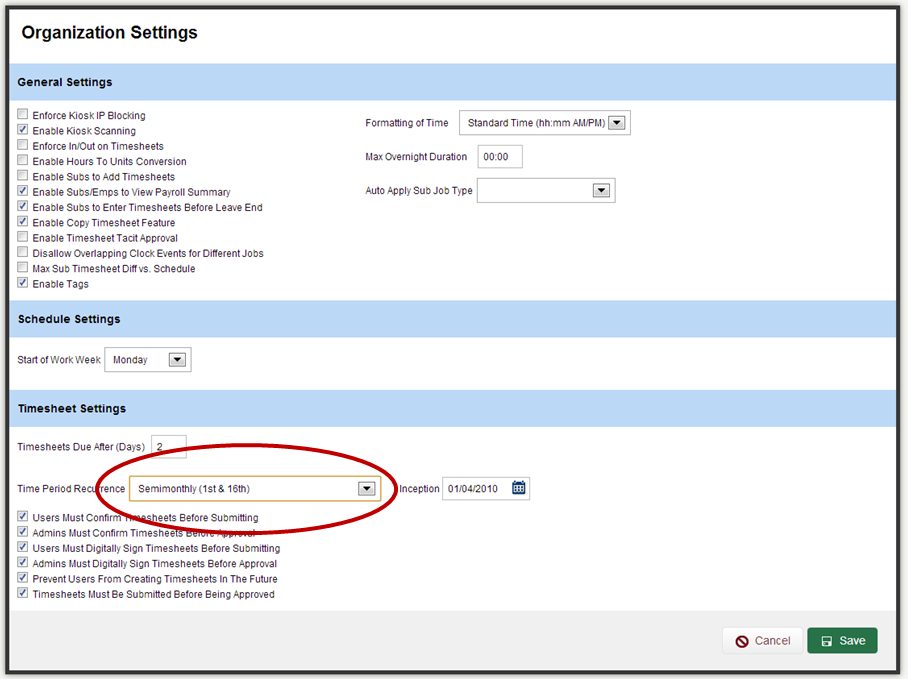
Timesheet Settings: Semimonthly 1st & 16th
In response to Customer Feedback, VeriTime has added an additional Time Period Recurrence to the Timesheet Settings to accommodate a 1st & 16th Semimonthly schedule.
Reporting Enhancements
People Locator Update
There have been a few technical changes made behind the scenes to VeriTime that updates the way People Locator functions. There is no change to the way the report looks, however, the data that is returned for each employee is more precise than ever before.
Improved Status Reporting – Prior to this enhancement, any Employee who had not yet clocked in for the day was listed as Missing on the report, even when the report was run prior to the time the Employee was expected to clock in. With this update in place, an Employee will only be listed as Missing once the time he or she was expected, to clock in for the day according to their Work Schedule, has passed without a clock in.
The improved People Locator will now report the correct part of a split absence created in Aesop based on the time of day when the report is run.
View – People Locator has been updated to remove the paging when the report is displayed. You will now see all Employees displayed at once that you can scroll.
Payroll Review/Payroll Summary: Ignore OT Calculation Rules
In response to Customer Feedback, VeriTime has added a setting to Payroll Review and Payroll Summary that will allow the User to select the Option to Ignore OT Calculation Rules when grouping by Interface ID.
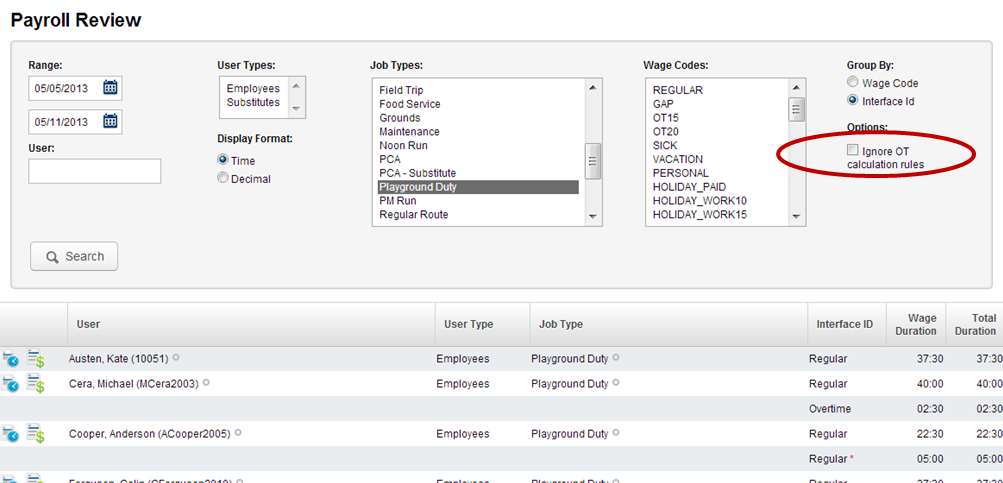
With the Option not selected, VeriTime will show Leave Time with an * indicating that line item Does Not Apply toward Overtime. This results in two line items listed as Regular when grouped by the Interface ID.
With the Option selected, VeriTime will ignore the Does Not Apply toward Overtime setting.
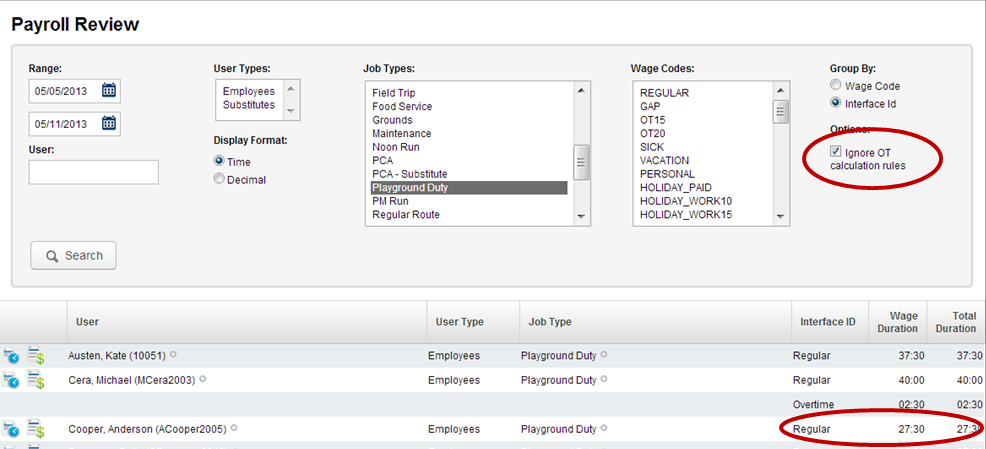
This results a single line item listed as Regular that combines the totals when grouped by the Interface ID.
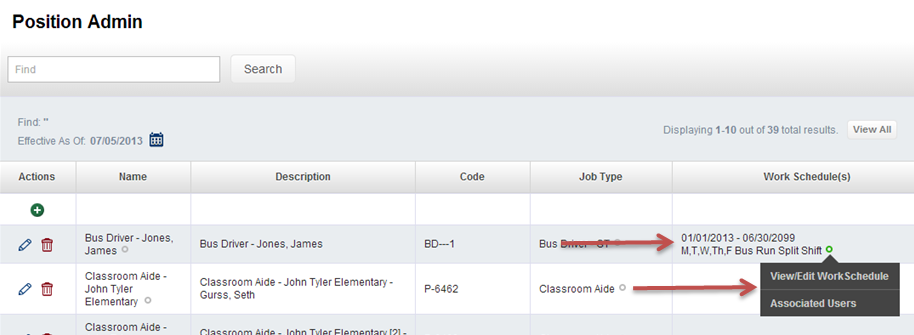
Position Admin Enhancement: View Work Schedule on the Position Admin grid
In response to Customer Feedback, the VeriTime team has added the Work Schedule to the Position Admin screen to show additional information about the position without having to edit it. A new columm has been added to the page that displays the description for the Work Schedule that is currently associated with the position along with the Effective Dates for that Work Schedule. As an added feature, a Quick Links icon has been added to the Work Schedule to allow the User to View/Edit the Work Schedule and to view which Users are Associated with that Work Schedule.
System Enhancements
Changes to Comp-Time
There have been several enhancements made to offer more flexibility to the way Comp Time functions within VeriTime. These enhancements are Optional and will not affect an Organization that wishes Comp Time to continue functioning the way it has been.
Comp-Time Settings – The VeriTime Team added a Comp-Time Settings selection to the User Settings Admin Screen that replaces the “Does not accrue Comp Time” setting. Now, when you select the “Comp Time Settings” checkbox in the Available window, you are given two Comp-Time options in the Assigned window. Those options are “Does not accrue Comp Time” and “Stop Auto Comp Time Deduction”.
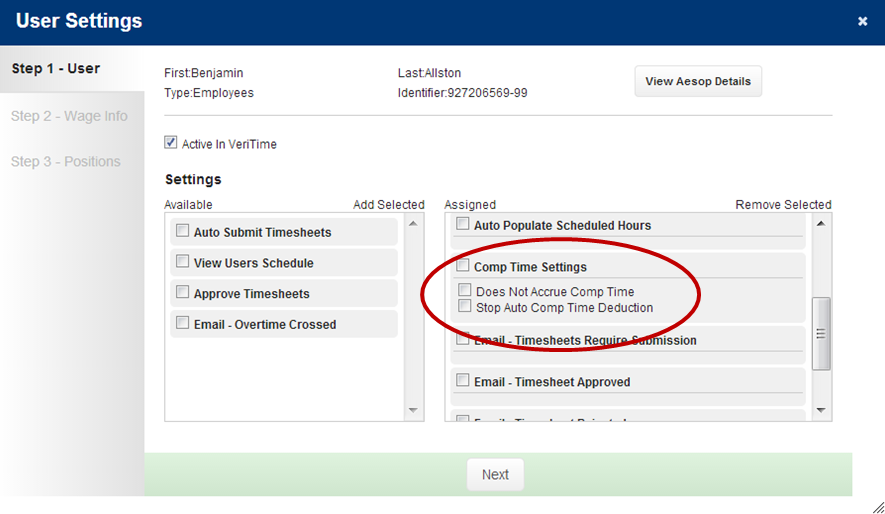
Does not accrue Comp Time – There has been no change to the way this option functions. When selected, the User will not accrue Comp Time in lieu of being paid overtime according to the payroll rules set for their Position.
Stop Auto Comp Time Deduction – When Comp Time is activated for the User and this option is also activated, the User will accrue Comp Time, but the system will not auto-deduct from the Comp time balance when the User has a shortfall in hours for the week (i.e. scheduled to work 40 hours, actually works 36 hours). Comp time will continue to accrue and the balance will only be decremented when the User enters an absence in Aesop with the absence reason set to “Comp Time”.
Comp Time Staff Group Settings – Two new Comp Time Options have been added for Staff Group Settings. “Max Negative Balance” and “Max Positive Balance” these options set Comp Time accrual thresholds that affect how Comp Time rules are applied to the Staff Group. Each of these Options can be configured independently for added flexibility.
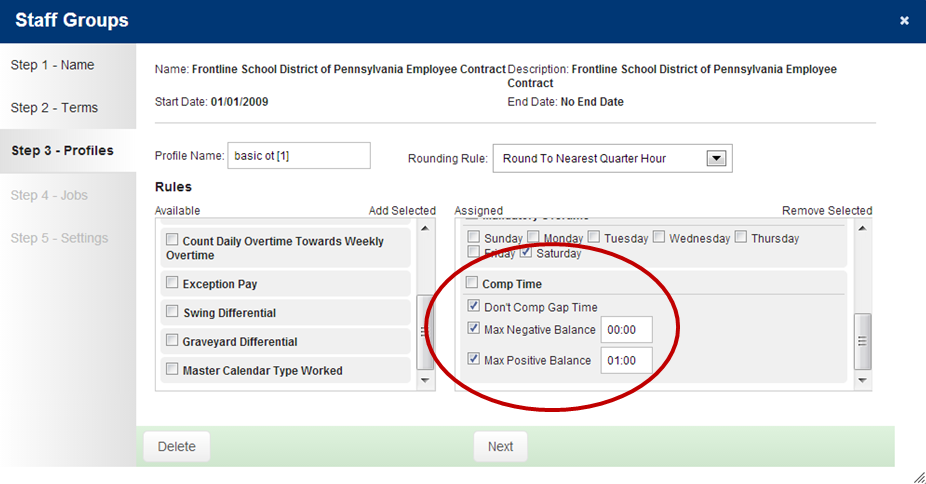
Max Negative Balance – This option allows a District to determine whether Employees can take comp time that has not yet been earned, or alternatively to set a maximum threshold that an Employee is permitted to fall into a negative balance situation.
A Max Negative Balance set at 00:00 will not permit an Employee’s Comp Time Balance to ever go negative. With the threshold set in this manner, an Employee who is scheduled to work 40 hours, actually works 28, and has a Comp Time Balance of 2 hours would receive total compensation for 30 hours in that week.
28 hours Regular time, 2 hours comp time. The remaining 10 hours would simply not be paid.
A Max Negative Balance set at 04:00 will allow an Employee to run a negative balance up to but not to exceed 4 hours. With the threshold set in this manner, an Employee who is scheduled to work 40 hours, actually works 28, and has a Comp Time Balance of 2 hours would receive total compensation for 34 hours in that week.
28 hours Regular time, 6 hours comp time [2 hour earned, 4 hours negative balance]. The remaining 6 hours would simply not be paid.
Max Positive Balance – This option allows a District to determine the maximum number of Comp Time hours an Employee can accrue and hold for future use.
A Max Positive Balance set at 20:00 will allow an Employee to accrue Comp Time up to but not to exceed 20 hours. With the threshold set in this manner, an Employee who has an accrued Comp Time balance of 18 hours and who works an additional 6 hours in a given week, will accrue 2 hours of Comp Time bringing their balance to the 20 hour threshold and will be paid for the 4 remaining 4 hours under the Wage Code “Comp Time Paid”. The payout will adhere to whatever Overtime Payroll Rules apply to the Employee’s Staff Group.
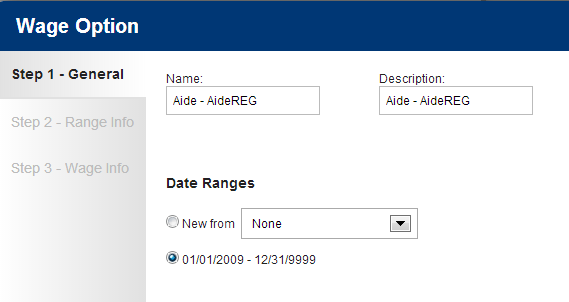
Wage Options: Description and Effective Dates
Description – VeriTime added a Description to go along with the Wage Option Name. This allows additional room to give a more detailed description of what is contained within a particular Wage Option.
Effective Dates – VeriTime now allows you to assign a date range to a Wage Option. These Effective Dates function the same as in other features within VeriTime. This enhancement will allow you to set a from and to date range for a Wage Option so that you can make slight changes to the wage details associated with that Wage Option (i.e. Pay Range and Step) and set a date at which time VeriTime will automatically begin using the new details. Effective Dating also provides a method by which to preserve historical data in the system so reports run for a particular date range will accurately reflect the Wage Option details that were actually in effect during that timeframe.
The VeriTime team will set the Wage Options currently in use for each Organization to be Effective Dated from 01/01/2009 – No End Date so there will be no disruption in functioning to any current customers. You will only notice a change when setting up new Wage Options or if you choose to use this enhanced functionality to expire an active Wage Option and institute a replacement Wage Option.
Barcode Creator: Include Users with No Active Positions
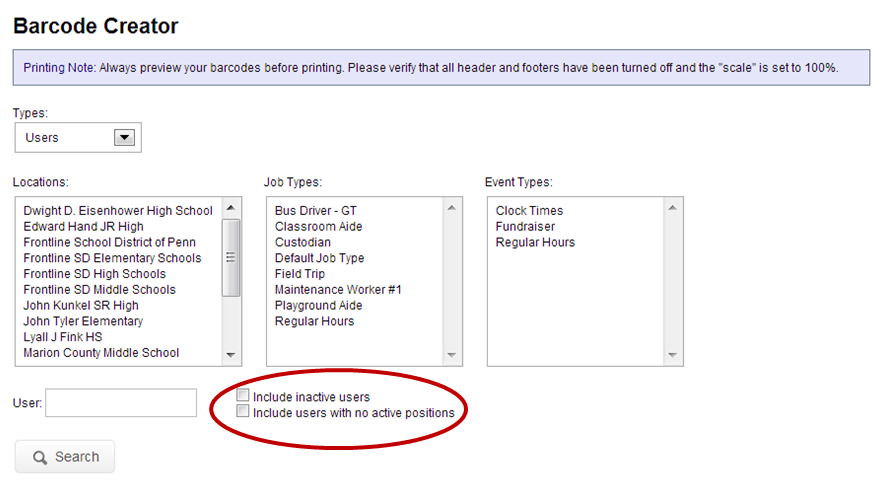
Currently, VeriTime only allows Barcodes to be created for Employees assigned to Active Positions. This enhancement to the Barcode Creator allows an Organization to print User Barcodes for Subs who are not assigned to Positions.
Barcode Creator: Print Barcodes Before Employee Begins Employment
This enhancement to the Barcode Creator allows an Organization to print User Barcodes for Employees who have not yet begun their employment for up to two weeks prior to the Employee’s start date.
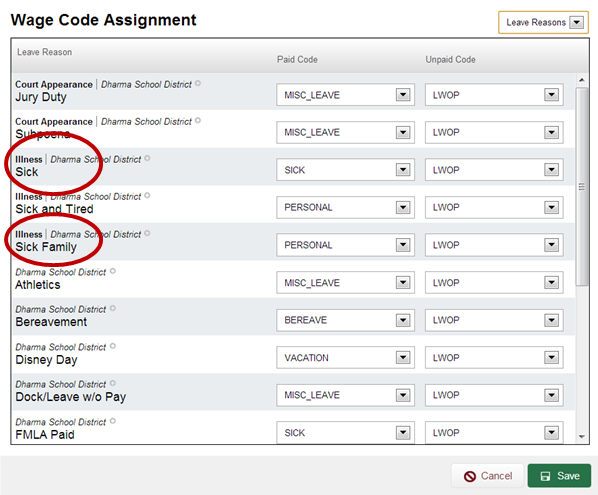
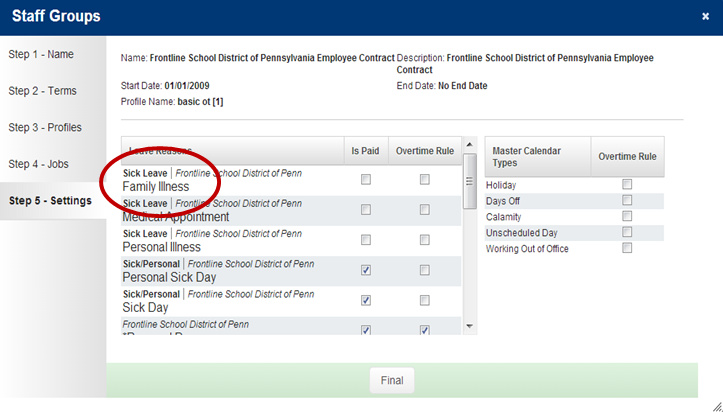
Wage Code Assignment and Staff Group Profile Wizard step 5: Display the Bucket name for Leave
The Wage Code Assignment screen and Step 5 of the Staff Group Profile wizard have been updated to display the Bucket name when one is assigned in Aesop. This enhancement will help to differentiate leave reasons.
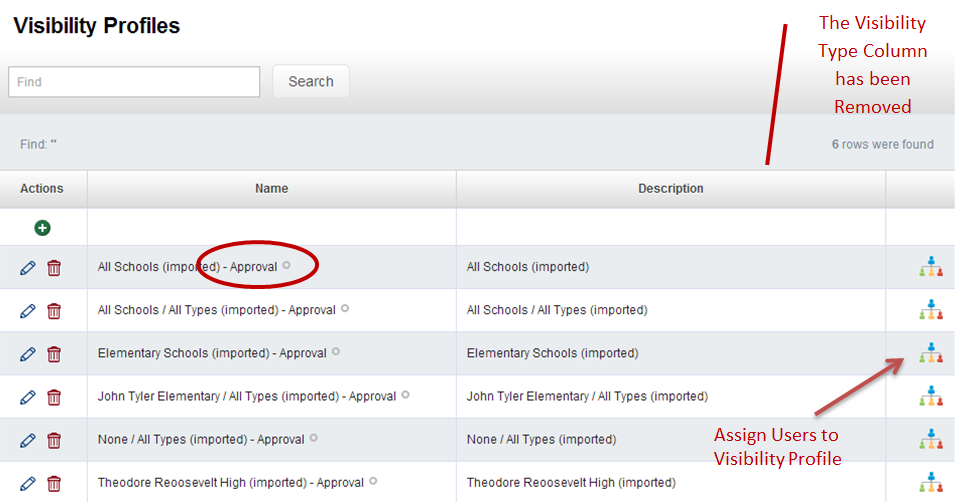
Visibility Profiles – Several Changes
The VeriTime team has made several behind the scenes changes to the system that affect the way Visibilities are handled.
Removal of Visibility Types - One of the most prominent changes is the removal of Visibility Types. There is no longer a need to differentiate between “Timesheet Approval” and “Default” visibilities. From this point forward when a new user is created, only one Visibility Profile need be assigned.
Assign Multiple Visibilities to a User – This enhancement eliminates the necessity to update two Visibility Profiles and ensure they are kept in sync. Additionally, going forward, you will have the ability to assign more than one Visibility to a person. This will offer the opportunity for an Administrator with a large number of employees in his or her Visibility to section off employees into manageable groups. This change also opens the possibility to assign an Alternate Approver temporarily, who could take over Approvals for another Administrator while he or she is on vacation or leave.
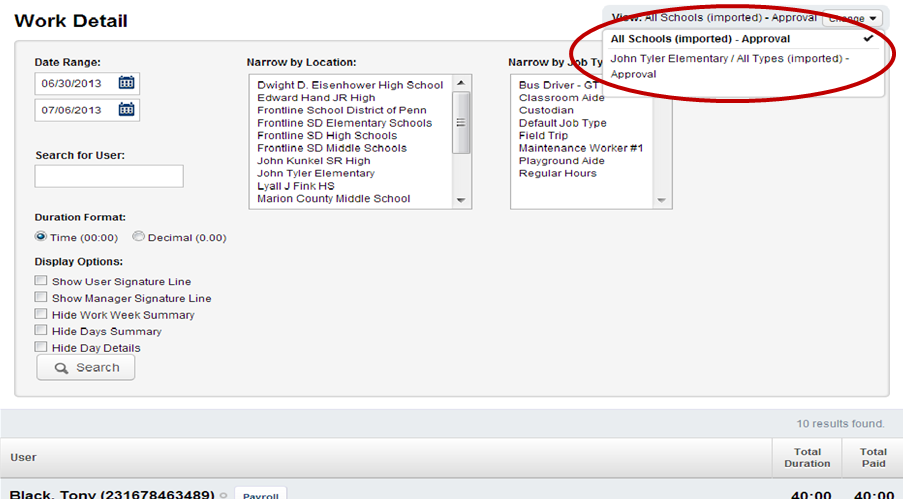
Selecting From Multiple Visibility Profiles – When an Admin has two or more Visibility Profiles assigned, a picklist will appear on the screen that will enable the user to choose which visibility to use; the box will not appear if the user has only one Visibility Profile set. Once a Visibility is selected from the picklist, only the information available to the chosen Visibility will be shown on the screen. The Visibility Profile selection will follow through the system until the User chooses to change Visibilities.
The areas affected when more than one Visibility is assigned to a User are:
- Change Assignment
- Visibility Hierarchy
- Report Writer
- Emails
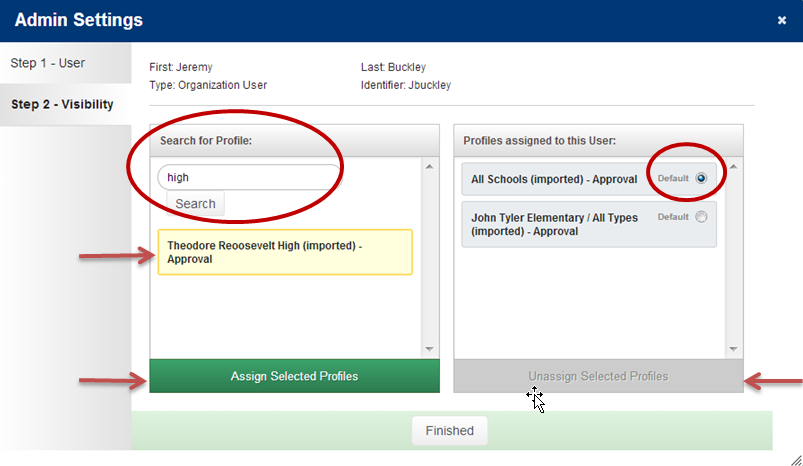
Applying a Visibility Profile to a User (Changes to Admin Settings) – Step 2 of the Admin Setting Wizard [see screenshot below] has also changed to accommodate this enhancement. From this point forward, you will be required to enter a search term and click on the Search button. VeriTime will return a list of all Visibility Profiles that meet the search criteria. Click on one or more (no need to hold the Ctrl key while selecting) of the Visibility Profiles in the search window, then click on “Assign Selected Profiles”. The selected Profiles will move to the Profiles assigned to this User window. This operation can be performed in the reverse to Unassign Selected Profiles. Additionally, you will notice the radio button on each assigned profile that is used to set which Visibility will be the User’s default Visibility profile. The Default setting will instruct VeriTime to display everything within the system that should be visible for that profile. If only one profile is assigned, that will be the default Visibility Profile used. If more than one is assigned, the Default Visibility Profile is the one the system will use until the Admin changes to an alternate profile.
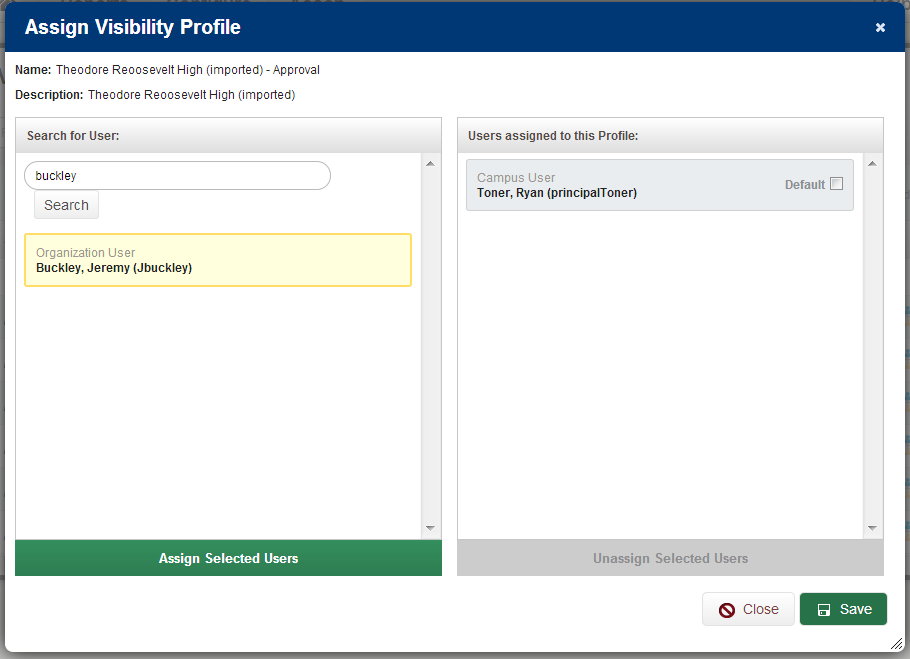
Assigning Users to a Visibility Profile – Also included in this enhancement, is the ability to assign Users to Visibility Profiles. An Icon has been added to the Visibility Profile Screen [see 1st screenshot in section 2.4.7 above] that will launch a popup wizard to assign Users to the selected Visibility Profile [see screenshot below].
The Assign Visibility Profile Wizard functions in the same manner as the Admin Settings wizard. Type a User’s name into the box, click the Search button. The System will return Users with a name matching the search criteria. Click on the appropriate User or Users then click “Assign Selected Users”. Those Users will transfer from the “Search for User” window to the “Users assigned to this Profile” window. This operation also works in the reverse to “Unassign Selected Users”
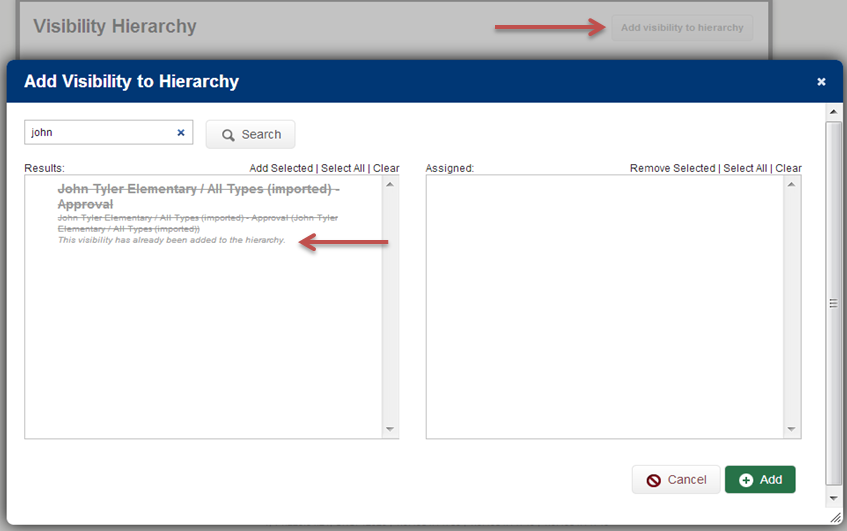
Adding a Visibility Profile to the Visibility Hierarchy – Visibilities will no longer be added directly to the Visibility Hierarchy. [See screenshot below] When a visibility should have Approver capabilities, launch the Visibility Hierarchy Admin screen, click the “Add visibility to hierarchy” button to launch the Add Visibility to Hierarchy popup wizard. Enter a search term and click the Search button. The system will return all matching Visibility Profiles. Select the Visibility and click the Add button. (The visibility Profile in the screenshot is already added to the Visibility Hierarchy therefore the system displays the name struck through with the message “This visibility has already been added to the hierarchy”).
Customer Feedback
Your feedback is one of the most important factors that will shape the growth of VeriTime! We will continue to work with you on identifying and enhancing VeriTime based on your input, so keep the feedback coming.
Customer Impact
If you would like assistance or additional training regarding the new features delivered in this release, please feel free to contact the VeriTime Client Services team. This release is expected to go into production during the week of July 12th.
