Table of Contents
I. Timesheet Summary
II. Timesheet Details
III. Timesheet Hours Summary
Let’s take a deeper look at the nooks and crannies of the “Timesheet” page.
Timesheet Summary (Top of the Timesheet)
At the top of the timesheet you will see the name of the user as well as the date range, total hours, and paid hours. You will also have some utility options.

Utility Options
![]()
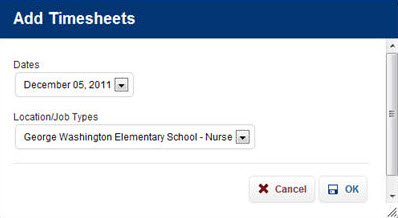
Add Timesheets
![]()
The first icon in the utility options represents “Add Timesheets”. Click it to bring up the pop-up window. This will allow you to enter time for a location and job type that are not currently displayed. Choose a date you want to add a timesheet to and which location/job type combination you would like to use. Click OK to save or Cancel to cancel.
Copy Timesheets
![]()
This icon represents the “Copy Timesheets” option. If you are manually entering time, you can copy the times for a day by clicking the icon. A pop-up like the one below will come up.
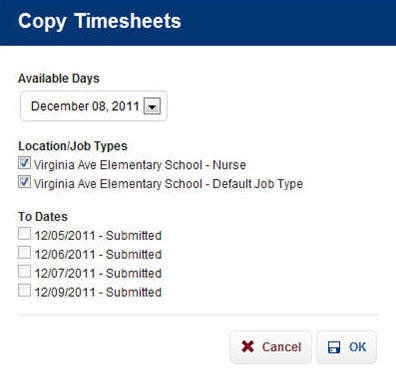
Select the date and Location/Job Type you want to copy, and select the day/days to which you want to copy those times. Then click the OK button. This will take the times from the currently selected date for that location/job type, and copy them to all the days checked.
Move Timesheet Events
![]()
This feature allows you to move a “Timesheet Event” from one timesheet to another on the same day.
To launch the “Move Timesheet Events” screen, click on the Move Timesheet Events icon. Click here for more info on this functionality.
Payroll Summary
![]()
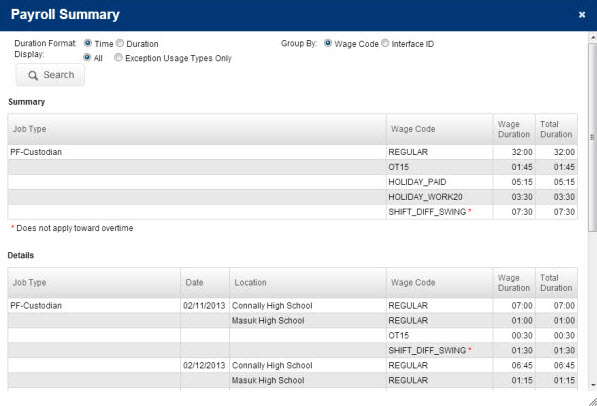
The next icon (the $ symbol) represents the Payroll Summary. To see a breakdown of the hours by pay type (Regular, Overtime, etc.), click this icon. This will open a pop-up window showing the payroll summary for this timesheet. Below is an example of a payroll summary.
The page is broken up into three sections. The top section provides different filtering and grouping options.
The Exception Usage Types Only option will limit the Wage Codes to only exception Wage Codes assigned in the Leave & Wage Code screen.
The Group By option allows a user to view the payroll data by VeriTime’s Wage Codes or by a combination of Interface ID and Custom ID. The system will attempt to use the Custom ID provided in the Wage Option screen. If that does not exist, the system will use the Interface ID provided on the Leave & Wage Code screen. If that does not exist, the system will default to use VeriTime’s Wage Code.
The Summary section provides a summary of payroll information by Job Type and Wage Code.
The Details section provides a detailed list of payroll information by Job Type, date, location and Wage Code.
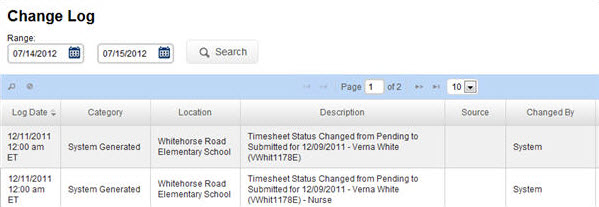
Change Log
![]()
Click this icon to see the Change Log for this timesheet. You can change the date range for the change log to see more information. Learn more about Change Logs here.
Timesheet Details (Middle of the Timesheet)
![]()
Click on a left tab to jump to the timesheet for that day.
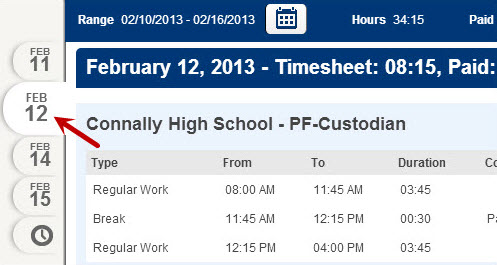
The section shown below is the main part of the timesheet.
Schedule
Note that each combination of location and job type will have its own entry here. (Use the Add Timesheets icon described above to create an entry if the location/job type you need is not displayed. If you don’t need an entry that is displayed, you can delete it by clicking the delete button on the right.)

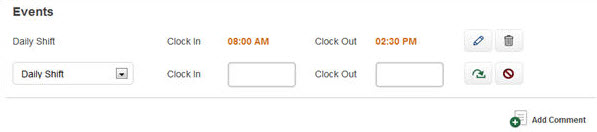
Events
The second section (Events) is the one you will use the most, because this is where you will enter or modify times or durations. (If the web clock was used, those times will already be in this section.)
To add an event, choose an event type in the drop-down menu and type the times into the empty “Clock In” and “Clock Out” boxes. Then click the green confirm button. That event will be added to the timesheet. To edit an event, click the pencil icon. Use the trash can icon to delete an event.
Remember, to save these changes you must click the Save button at the top of the timesheet.
Comments
You also have the ability to leave comments about this day in the timesheet. To leave a comment, click the Add Comment button at the button of the section.
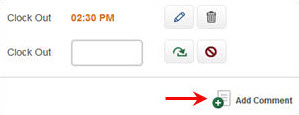
This will open a box where you can leave your comments. Click the green check mark button to save your comments. Click the red cancel button to cancel the comments.
![]()
Admin Time
Occasionally, you might see a box called Admin Times. This is where all Admin Time will be displayed. Admin Time might be time that you manually add or remove for an employee, auto-deducted breaks, or differences between scheduled times & durations (if using the auto-populate schedule feature).

The Admin time can be edited by clicking the pencil icon.

To save any changes you make to the Admin Time, click the Save button at the top of the timesheet.
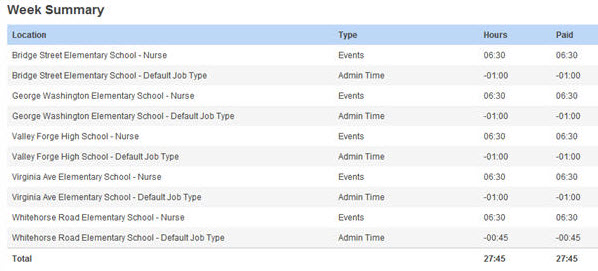
Timesheet Hours Summary (Bottom of Timesheet)
At the bottom of the timesheet, the hours for the time period will be summarized by location/job type, absences, and Admin Time.